You notice it before you can ignore it — a dim patch on the road, or a quick flash from an oncoming driver. One of your headlights is out. Beyond the annoyance, a dead headlight is a safety issue and a surefire way to attract unwanted attention from law enforcement.
The good news? Replacing a headlight bulb on a Honda Civic is a job most owners can handle at home. The catch: the process varies dramatically depending on the year of your car. A 2003 Civic and a 2018 Civic are not even close to the same experience. That’s why generic guides fall short.
This walkthrough covers the right bulb for every Civic generation, the correct tools, step-by-step instructions by model year, and the mistakes that trip people up most often. Let’s get into it.
Step 1: Find the Right Bulb for Your Civic
This is where most people slip up. The Honda Civic has gone through significant headlight design changes over the decades. Using the wrong bulb — or assuming your year matches a guide written for a different generation — wastes both time and money.
Three reliable ways to confirm your bulb size:
- Check the owner’s manual. The bulb section will list exact specifications for your trim.
- Read the old bulb. The size (H11, 9006, etc.) is printed on the base of most halogen bulbs.
- Use a parts store bulb finder. Enter your year, make, model, and trim at any major auto parts retailer.
Here’s a quick reference by generation:
| Model Year | Body Style | Low Beam | High Beam |
|---|---|---|---|
| 2022–Present | All | OEM LED (non-serviceable) | OEM LED (non-serviceable) |
| 2016–2021 | All | H11 | 9005 (HB3) |
| 2014–2015 | Sedan | 9006 (HB4) | 9005 (HB3) |
| 2014–2015 | Coupe | H11 | 9005 (HB3) |
| 2012–2013 | All | 9006 (HB4) | 9005 (HB3) |
| 2006–2011 | All | 9006 (HB4) | 9005 (HB3) |
| 2001–2005 | All | 9006 (HB4) | 9005 (HB3) |
| 1992–2000 | All | 9003 / H4 (Dual Beam) | 9003 / H4 (Dual Beam) |
Halogen, LED, or HID: Which Bulb Should You Buy?
Once you know the size, you have a choice in technology.
Halogen is the standard factory option. It’s affordable ($20–$40 a pair), widely available, and easy to install. The light is warm and yellowish, and lifespan typically runs around 1,000 hours. It’s perfectly adequate for most drivers.
LED aftermarket bulbs have become popular for their long lifespan (30,000+ hours), crisp white light, and low energy draw. A quality pair typically costs $60–$200. However, there’s an important legal and safety issue here — covered below.
HID (High-Intensity Discharge) bulbs produce very bright, far-reaching light but require a ballast for installation. Kits typically start around $100. They’re less common for DIY replacement.
The LED Upgrade Warning You Shouldn’t Skip
Installing an LED bulb into a headlight housing designed for halogen is illegal in most jurisdictions and creates a genuine hazard. Here’s why: halogen bulbs emit light in all directions, and the housing’s reflector is engineered to focus that omnidirectional output into a controlled beam. LED bulbs emit directional light from flat chips. Put them in the wrong housing, and the beam scatters — blinding oncoming drivers while doing a poor job of lighting the road ahead.
The only legal way to upgrade to LEDs is to replace the entire headlight assembly with a DOT-approved unit specifically designed for LED technology. Swapping just the bulb doesn’t meet federal safety standards, can result in fines of $100–$200, and will likely cause a failed safety inspection.
What Tools Do You Need?
Most headlight replacements on the Civic need minimal gear, but having the right items prevents avoidable mistakes.
Non-negotiable:
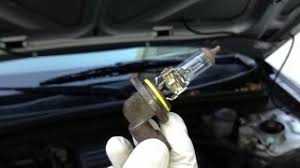
- Nitrile gloves — The oils from bare skin cause hot spots on halogen glass, shortening bulb life significantly.
- Safety glasses — Good habit any time you’re working in an engine bay.
Useful for most jobs:
- Flathead and Phillips screwdrivers
- 10mm socket, ratchet, and extension
- Plastic trim removal tool (saves paint and clips)
- Clean rag or paper towels
Model-specific needs:
- Some newer Civics require no tools at all
- 8th and 9th gen jobs may need extra steps — detailed below
Step-by-Step: How to Replace the Headlight Bulb by Generation
10th & 11th Gen (2016–Present) — Straightforward Twist-Lock
If your Civic came with factory LED headlights (common on Touring and top trims), the bulb is integrated into the assembly and is not user-serviceable. A failure means replacing the entire headlight unit — a job better suited to a shop.
For Civics in this generation equipped with halogen bulbs:
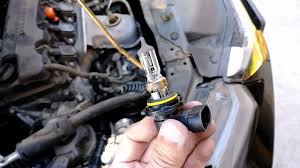
- Open the hood and locate the back of the headlight housing.
- Press the release tab on the wiring connector and pull it free. It may take a firm, steady tug.
- Grip the plastic bulb socket and rotate it counter-clockwise about a quarter-turn until it stops.
- Pull the bulb straight out.
- With gloves on, insert the new bulb. Small tabs ensure it can only go in one orientation — rotate slightly until it seats fully.
- Twist the socket clockwise a quarter-turn to lock.
- Reconnect the wiring harness until it clicks. Test both beams before closing the hood.
9th Gen (2012–2015) — Different on Each Side
The driver’s side is relatively accessible. The passenger’s side is not.
Why the passenger side is difficult: The windshield washer fluid reservoir neck runs directly behind the headlight housing, blocking easy access.
Steps for the passenger side:
- Locate the washer fluid reservoir neck — the black plastic tube at the front of the reservoir.
- Find the plastic push-pin holding it in place. Use a trim tool to pop up the center pin, then pull the whole pin out.
- Lift the reservoir neck straight up and set it aside.
- You now have room to reach the bulb socket. Disconnect the wiring harness, twist counter-clockwise to remove the old bulb, install the new one, twist clockwise to lock, and reconnect.
- Return the reservoir neck and press the push-pin back in.
Driver’s side: Follow the same disconnect-and-twist procedure as described for the 10th gen.
8th Gen (2006–2011) — Skip the Engine Bay, Use the Wheel Well
The 8th generation Civic has a famously cramped engine bay. On the driver’s side, the coolant reservoir blocks access. On the passenger’s side, the battery is in the way. The “official” approach of removing these components is time-consuming and frustrating.
The smarter method: access through the wheel well.
- Park on a level surface and turn the steering wheel fully to the opposite side of the headlight you’re replacing. (Replacing passenger side? Turn left.) This creates maximum clearance inside the wheel well.
- Look inside the wheel well along the front edge of the fender liner. You’ll find two or three plastic push-clips. Use a trim tool or flathead screwdriver to pop the center pin, then pull the clip out entirely.
- Peel back the fender liner far enough to slide your arm up behind the headlight housing.
- Feel for the wiring connector, disconnect it, then twist the bulb counter-clockwise to remove it.
- Install the new bulb (gloves on), twist clockwise to lock, reconnect the harness.
- Push the fender liner back and reinstall the clips.
This method saves 20–30 minutes compared to removing the battery or reservoir.
Pre-2006 (1992–2005) — Classic Retainer Clip System
Older Civics use a different retention system that many newer owners are unfamiliar with.
- Open the hood and locate the back of the headlight housing.
- Pull off the rubber dust cover or boot sealing the back of the housing.
- Disconnect the wiring harness from the bulb.
- Look for a metal wire retainer clip securing the bulb. Push the end of the clip inward and to the side to unhook it from its tab. It will swing down like a small gate.
- Pull the old bulb straight out.
- Insert the new bulb, aligning its tabs correctly with the housing slots.
- Swing the retainer clip back up and hook it securely in place.
- Reconnect the harness and press the rubber dust cover back on firmly.
Troubleshooting Common Problems
The Connector Won’t Unplug
This is the most common frustration, especially on 9th gen Civics. Heat and age bond the connector to the bulb socket over time.
- Press the release tab fully — sometimes using a small flathead screwdriver directly on the tab helps.
- Wiggle the connector side to side while pulling backward. Don’t just yank straight out.
- If it’s truly seized, a small amount of electrical contact cleaner around the connection point can loosen it. Keep it away from painted surfaces.
- If the connector has melted to the bulb from excessive heat, the connector socket itself needs replacing. Auto parts stores sell pigtail splicing connectors for this exact situation.
The Bulb Won’t Twist Out
- Make sure you’ve rotated it fully counter-clockwise until it hits the stop.
- Wear gloves for a better grip — the rubber O-ring sealing the bulb often sticks with age.
- A firm, wiggling pull (not just straight back) usually breaks it loose.
The New Bulb Doesn’t Light Up
Work through this checklist before assuming the bulb is defective:
- Is the connector fully seated? Push it on until it clicks.
- Is the bulb fully locked? It needs to be twisted all the way to the locked position for the contacts to align.
- Did you install an LED? Some LED bulbs are polarity-sensitive. Unplug, rotate the connector 180 degrees, and plug back in.
- Check the fuse. If both headlights are out (or both low beams), a blown fuse is likely the cause. Find the headlight fuse in your owner’s manual, locate it in the fuse box, and check if the metal strip inside is broken.
- Still not working? A corroded socket or wiring fault may be the issue. This is the point where a mechanic’s diagnostic is the right next step.
What Does It Cost? DIY vs. Professional
| Job Type | DIY Parts Cost | Professional Labor | Total (Professional) |
|---|---|---|---|
| Standard halogen (pair) | $20–$40 | $40–$60 | $67–$86 |
| Premium halogen (pair) | $50–$60 | $40–$60 | $90–$120 |
| LED upgrade (pair) | $60–$200 | $40–$60+ | $100–$260+ |
For most Civic owners, DIY headlight replacement is one of the higher-value maintenance tasks to do yourself. On older and mid-generation models, the job often takes under 15 minutes and saves $40–$60 in labor.
One important caveat for newer Civics: if your factory LED headlight assembly fails (rather than a single bulb burning out), the cost picture changes completely. Replacing a sealed LED assembly on a modern vehicle can easily run $900–$1,200 or more, plus labor and potential recalibration of safety systems. That’s no longer a bulb swap — it’s a significant repair.
After Installation: The Steps Most People Skip
Check Your Headlight Alignment
Even a slight variation between the old and new bulb — in filament position or manufacturing tolerance — can shift where the beam points. Misaligned headlights either fail to light the road properly or create glare that blinds other drivers.
Quick alignment check:
- Park on level ground, about 25 feet from a flat wall or garage door. Make sure tire pressure is correct.
- Turn on low beams. Use masking tape to mark the center of each headlight’s bright spot on the wall.
- Open the hood and locate the adjustment screws on the back of each headlight housing. These are usually accessible via small access holes and require a Phillips screwdriver or 8mm socket.
- Adjust vertically: the top edge of the bright beam should fall at or just below the height mark you taped. Turn the adjuster screw in small increments and observe the beam movement on the wall before making further changes.
Replace Both Sides at Once
If one bulb has burned out, the other is close behind — they’ve been running the same hours under the same conditions. Replacing both at once costs little extra and ensures even brightness and color match across both headlights.
Keep the Lenses Clean
Plastic headlight lenses yellow and haze over time from UV exposure. This oxidation can cut light output significantly — sometimes making a perfectly good bulb appear dim. Periodic lens restoration treatments remove the oxidation and restore clarity. It’s an easy and cheap maintenance step that many owners overlook.
Wrapping Up
Replacing a Honda Civic headlight bulb is one of the most practical DIY maintenance tasks available to Civic owners — but only if you approach it with the right information for your specific year. The 2003 Civic, the 2009 Civic, and the 2018 Civic each require a different approach.
The core steps are consistent: identify the correct bulb, gather what you need, follow the generation-specific access method, install the new bulb without touching the glass, and verify alignment before driving. Do it right, and you’ll have the job done in under 20 minutes for most models.
If your Civic is a recent model with factory-sealed LED headlights, the calculus changes — but now you know what you’re dealing with before you get started.
FAQ
Q: Can I replace my Honda Civic headlight bulb without going to a mechanic?
Yes, for most Civics made before 2022. The process ranges from very simple (10th and 11th gen halogen models) to moderately tricky (8th gen), but all are DIY-friendly with the right approach.
Q: Why did my new headlight bulb burn out quickly?
Most likely, the bulb glass was touched with bare hands during installation. Skin oils create heat concentration points on halogen glass. Always handle new bulbs with nitrile gloves.
Q: Can I replace my Honda Civic headlight bulb without going to a mechanic?
Yes, for most Civics made before 2022. The process ranges from very simple (10th and 11th gen halogen models) to moderately tricky (8th gen), but all are DIY-friendly with the right approach.
Q: How do I know if my headlight issue is the bulb or a fuse?
If only one headlight is out, the bulb is the likely culprit. If both headlights (or both low beams) are out simultaneously, a blown fuse or bad relay is more probable. Check the headlight fuse in your fuse box before replacing bulbs.
Q: My 2022 or newer Civic has a burnt-out headlight — can I replace it myself?
If your Civic uses factory LED headlights (common from 2022 onward), the LED is integrated into the sealed assembly. Individual bulb replacement isn’t possible — the entire assembly needs servicing or replacement, typically by a professional.