Your Honda Odyssey is idling rough. It shakes at red lights, hesitates when you accelerate, or stalls when you come to a stop. You’ve already started Googling spark plugs and fuel injectors — but before you go down that road, check something simpler first.
A dirty throttle body causes all of those symptoms. And cleaning it yourself costs about $15 in supplies and an hour of your time, compared to $200–$300 at a shop.
This guide walks you through the complete process — what the throttle body does, how to know when it’s dirty, the safest way to clean it, and the one step most DIYers forget that causes the job to feel like it went wrong.
What the Throttle Body Does (and Why It Gets Dirty)
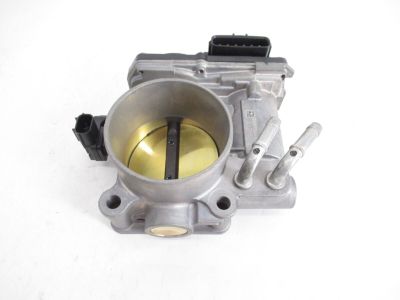
The throttle body is the gateway between your air filter and your engine. Inside it sits a round metal plate — called the throttle plate or butterfly valve — that controls how much air enters the engine when you press the accelerator.
On every Honda Odyssey built in the last two decades, this system is electronic. There’s no cable connecting your foot to the plate. Instead, sensors in the pedal send a signal to the engine control module (ECM), which tells a small motor in the throttle body exactly how far to open the plate. This is called Drive-by-Wire (DBW), and it’s important to understand before you start cleaning, because forcing the plate open manually can break those internal gears.
So where does the gunk come from?
Not from dusty outside air — your air filter handles that. The real culprit is the Positive Crankcase Ventilation (PCV) system. During normal combustion, a small amount of gas and oil vapor escapes into the engine crankcase. Rather than venting it to the atmosphere, the PCV system routes it back through the intake to be re-burned. Over thousands of miles, that oily vapor deposits a layer of black, sticky carbon right where the throttle plate closes. Eventually, the buildup starts interfering with airflow — and that’s when you notice problems.
Signs Your Throttle Body Needs Cleaning
These symptoms tend to develop gradually. The earlier you catch them, the easier the fix.
Rough or bouncing idle. The engine needs a small, precise airflow to hold a steady idle. Carbon buildup disrupts that. The ECM keeps compensating, which you feel as vibration or an RPM needle that won’t settle.
Hesitation on acceleration. Thick carbon deposits create a physical ledge inside the throttle bore. The plate gets stuck on it at idle and then “pops” open when you press the gas. The result is a jerky response right when you’re pulling away from a stop.
Stalling at stops. At this stage, the buildup is blocking enough airflow that the engine can’t sustain an idle. It stalls when you slow down or shift into gear — then starts back up fine.
Worse fuel economy. When airflow is restricted, the ECM compensates by adding extra fuel to maintain the right mixture. Your MPG drops as a result.
Limp mode. In severe cases, the ECM gets sensor readings so far out of range that it activates a reduced-power mode to protect the engine. You’ll lose acceleration and feel like something is seriously wrong.
Check Engine Codes Related to the Throttle Body
If the issue is bad enough, you’ll get a Check Engine Light and a stored code. Here are the most common ones tied to throttle body problems on the Odyssey:
| Code | What It Means |
|---|---|
| P0120–P0124 | Primary throttle position sensor out of range. Can be caused by a stuck plate or faulty sensor. |
| P0220–P0229 | Secondary throttle position sensor fault. Honda uses redundant sensors as a fail-safe. |
| P0507 | Idle RPM higher than expected. Very common after cleaning — almost always a vacuum leak or skipped relearn. |
| P2101 | Throttle motor range/performance issue. The motor may be struggling with a stuck plate. |
| P2135 | The two position sensors disagree with each other — a common DBW failure mode. |
| U0107 | The ECM has lost communication with the throttle body’s control module. Could be wiring or a failed unit. |
An OBD-II scanner costs $20–$40 and tells you exactly what you’re dealing with before you spend any money.
What You’ll Need to Clean the Throttle Body on Your Honda Odyssey
Tools:
- Ratchet with 10mm and 12mm sockets
- Flathead and Phillips screwdrivers
- Pliers (for spring-type hose clamps)
- Torque wrench (important for reassembly)
- Soft-bristled brush or old toothbrush — never a wire brush
Supplies:
- Throttle body cleaner (not carb cleaner — more on this below)
- New throttle body gasket — budget $5–$10, it’s cheap insurance
- Safety glasses and disposable gloves
- Clean, lint-free rags
Why not carb cleaner? It’s a much harsher solvent designed for old carburetors. Modern throttle bodies have a low-friction internal coating that carb cleaner strips away. Use only a product that specifically says “throttle body cleaner” on the label.
Where to Find the Throttle Body on Your Odyssey
On every generation of the Odyssey, the throttle body is mounted at the front of the intake manifold — right where the large air intake tube from the air filter box meets the engine. Follow that black plastic tube and you’ll find it.
3rd Gen (2005–2010): The J35A-series engine gives easy access to the throttle body once you pull the plastic engine cover and intake tube. Four bolts, straightforward job.
4th Gen (2011–2017): Similar layout. While you have the intake tube off, inspect the flexible rubber section for cracks — it’s a known weak point on these models and can cause the same rough idle symptoms.
5th Gen (2018–present): The J35Y6’s engine bay is more tightly packaged. The throttle body is still in the same location, but you may need to move a wiring harness or bracket to get a clear approach.
How to Clean the Throttle Body on Your Honda Odyssey
Removing the throttle body completely gives you a better clean, safer access to the plate, and the chance to install a fresh gasket. This is the right way to do it.
Step 1 — Cool down and disconnect the battery. Work only on a cold engine. Disconnect the negative battery terminal with a 10mm wrench and tuck the cable aside. This is a safety step and also begins the ECM reset process.
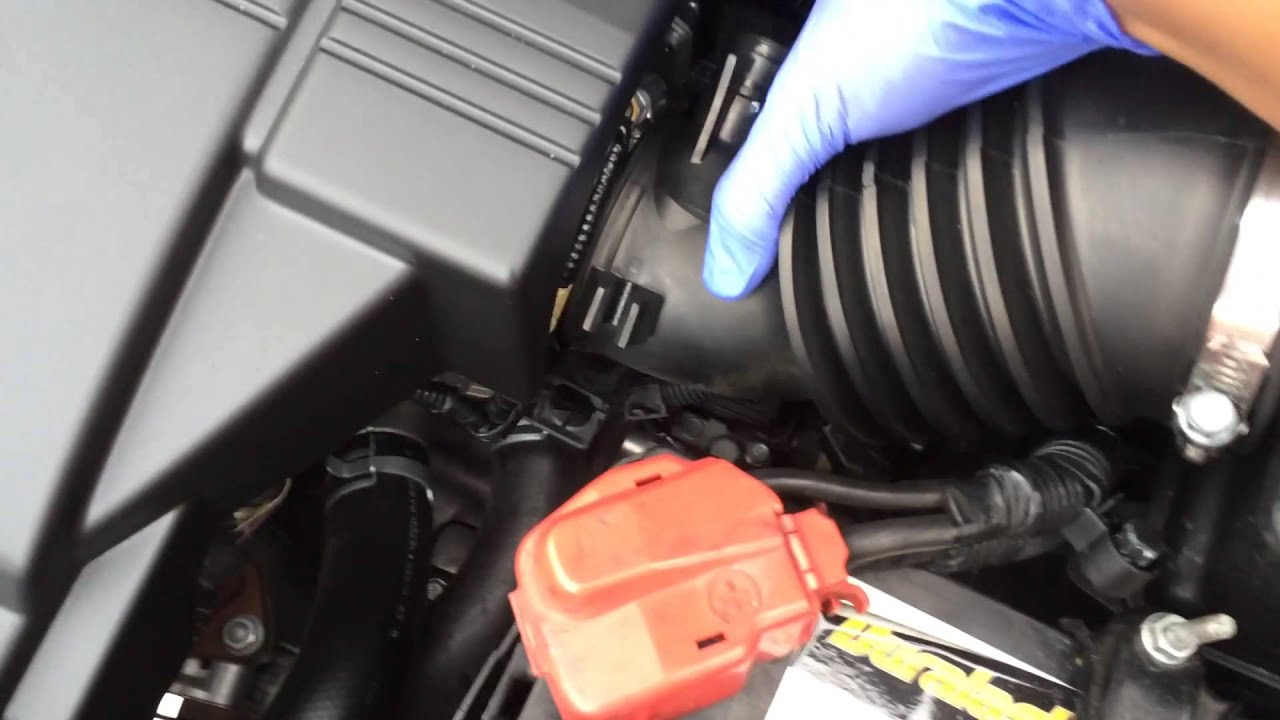
Step 2 — Remove the air intake tube. Loosen the clamps at both ends of the large intake tube — where it meets the air filter box and where it connects to the throttle body — and gently pull it free.
Step 3 — Disconnect electrical connectors and hoses. There’s a main electrical connector on the side of the throttle body. Press the release tab and pull it straight off. Note the locations of any small vacuum lines. If your model has coolant hoses running to the throttle body (for cold-climate icing prevention), gently pinch them off with pliers before disconnecting to limit spills.
Step 4 — Remove the four mounting bolts. Using a 12mm socket, loosen all four bolts a little before removing any of them completely. Remove the bottom two first, then support the throttle body with one hand while pulling the top two. Don’t let it hang by the wiring.
Step 5 — Remove and discard the old gasket. Peel the old gasket off the manifold face or the throttle body and throw it away. Do not reuse it.
Step 6 — Clean the throttle body. Set the throttle body on a clean rag on a flat surface. Spray throttle body cleaner generously inside the bore and on both faces of the throttle plate. The black carbon deposits will start dissolving immediately. Use your soft brush to gently scrub the edges of the plate and the bore — especially where the plate seals against the wall, which is where buildup causes the most restriction. Keep spraying and wiping until the metal looks clean and smooth.
Step 7 — Clean the mating surfaces. Wipe the mounting face on the intake manifold and the back of the throttle body with a clean rag lightly dampened with cleaner. Both surfaces need to be flat and free of debris for the new gasket to seal properly.
Step 8 — Reinstall with a new gasket. Place the new gasket on the manifold studs. Slide the throttle body into position and hand-thread all four bolts before torquing any of them. Using a torque wrench, tighten the bolts in a crisscross pattern to approximately 16–18 ft-lbs (verify the exact spec in your model’s service manual). Even clamping force is what makes the gasket seal.
Step 9 — Reconnect everything. Plug the electrical connector back in until it clicks. Reconnect any vacuum or coolant lines. Re-install the air intake tube and tighten the clamps. Reconnect the negative battery terminal.
The In-Place Cleaning Method (Quick but Limited)
If you prefer a shorter job, you can clean the throttle body without removing it — but this method is less thorough and requires more care with the electronic throttle plate.
- With the engine cold, disconnect the negative battery terminal.
- Remove the air intake tube from the throttle body.
- Reconnect the battery. Have someone sit in the driver’s seat, turn the ignition to ON (engine off), and press the gas pedal fully to the floor. This uses the throttle motor to open the plate safely — don’t try to move it with your hands.
- Spray throttle body cleaner onto a clean rag (not directly into the intake) and wipe the inside bore and the exposed plate surfaces. Let the cleaner do the work; scrub gently.
- Have your helper release the pedal and turn the ignition off. Disconnect the battery again and leave it off for at least 15 minutes before reconnecting.
This method gets the job done but leaves the back of the throttle plate inaccessible, and you can’t replace the gasket. It’s fine as a maintenance clean, but the full removal method is better for serious buildup.
The Idle Relearn Procedure — Don’t Skip This
Here’s where a lot of DIYers think they made a mistake. You finish the job, start the engine, and the idle shoots up to 1,500–2,000 RPM. The car feels worse than before.
You didn’t break anything. You just need to do the relearn.
For tens of thousands of miles, your Odyssey’s ECM learned how to compensate for carbon buildup — it kept the throttle plate slightly more open than it should be to maintain the right idle airflow. Now the throttle is clean, but the ECM is still using the old settings. The result is too much air at idle, which reads as a high RPM.
The relearn procedure forces the ECM to recalibrate its baseline from scratch.
Here’s how to do it:
- Turn off all electrical accessories — radio, AC, lights, everything.
- Start the engine. Put the transmission in Park or Neutral.
- Press the accelerator and hold the engine at a steady 3,000 RPM.
- Keep holding it at 3,000 RPM until the engine reaches full operating temperature. Wait for the radiator cooling fans to kick on — you’ll hear them clearly.
- Once the fans have cycled on, release the gas pedal completely. Let the engine idle undisturbed for five full minutes. Don’t touch the pedal, don’t turn on accessories.
- After five minutes, shut the engine off. Wait 30 seconds, then restart normally.
The engine should now settle into a smooth idle around 750 RPM. If it doesn’t, the most likely cause is a vacuum leak from a reused or improperly seated gasket.
Troubleshooting Common Issues After Cleaning
Idle is still high or surging: Run the relearn procedure again, following each step carefully. If that doesn’t fix it, you have a vacuum leak. Listen for a hissing sound near the throttle body. Check that the intake tube is fully seated, the clamp is snug, and that you didn’t accidentally leave a vacuum line disconnected.
Check Engine Light stays on: Give it 20–30 miles of normal driving first. A small amount of cleaning solvent can temporarily affect sensor readings. If the light stays on, read the code. A P0507 confirms a high idle issue (vacuum leak or incomplete relearn). A P0122 or P2135 means the throttle position sensor circuit isn’t reading correctly — check that the electrical connector is fully locked in.
What This Job Costs: DIY vs. Shop
| DIY | Shop | |
|---|---|---|
| Throttle body cleaner | ~$10 | Included |
| New gasket | ~$5–$10 | Included |
| Labor | Your time | $120–$180+ |
| Total | ~$15–$20 | $200–$300+ |
If the throttle body needs replacement rather than cleaning, shop costs can exceed $600. Doing the cleaning yourself at the right interval — generally every 30,000–60,000 miles, or when symptoms appear — can help you avoid getting to that point.
Quick Reference: What Not to Do
- Don’t use carb cleaner. It destroys the throttle body’s internal coating.
- Don’t force the throttle plate open. The DBW motor’s plastic gears are fragile. Use the gas pedal method or remove the unit.
- Don’t reuse the old gasket. A $5 gasket prevents hours of vacuum leak troubleshooting.
- Don’t skip the idle relearn. The ECM needs to recalibrate. No shortcut here.
- Don’t work on a hot engine. Let it cool completely before you start.
Wrapping Up
Cleaning the throttle body on your Honda Odyssey is one of the most cost-effective maintenance jobs you can tackle at home. It addresses a genuine performance issue with a clearly defined solution — no guesswork, no expensive parts, no specialized equipment beyond a torque wrench and the right cleaner.
Follow the removal method, use a fresh gasket, run the idle relearn, and your Odyssey should come back with a smoother idle and better throttle response. If symptoms persist after doing everything correctly, a stored fault code will point you toward the next step.
FAQ
How often should I clean the throttle body on my Honda Odyssey? Most mechanics suggest every 30,000 to 60,000 miles as a preventive measure. If you notice rough idling or poor acceleration before that interval, clean it early.
Can a dirty throttle body cause my Odyssey to fail emissions? Yes, indirectly. If a dirty throttle body causes misfires or an incorrect air-fuel mixture, it can trigger emission-related trouble codes and cause a failed emissions test.
What’s the difference between throttle body cleaner and carb cleaner? Carb cleaner is a stronger solvent formulated for older carburetors with no special coatings. Throttle body cleaner is gentler and safe for the low-friction coating inside modern DBW throttle bodies. Using the wrong product damages that coating permanently.
Do I need a special tool for the idle relearn? No. The Honda idle relearn procedure requires only your gas pedal and a few minutes. No scanner or additional equipment is needed.
Will cleaning the throttle body fix a P0507 code? Sometimes, but P0507 (idle RPM higher than expected) is more often caused by a vacuum leak or a skipped relearn after cleaning. Address both before assuming the throttle body is the problem.
How do I know if I need to clean or replace the throttle body? Cleaning resolves carbon buildup issues. Replacement is necessary when the throttle motor fails, the position sensors are damaged, or the housing itself is physically damaged. Codes like P2101 or P2135 that persist after cleaning typically indicate a failed unit.