The 2017 Honda CR-V came in various trim levels: LX, EX, EX-L, and Touring. What determines how you set your clock is primarily whether you have the standard 5-inch color LCD screen (typically on the LX and some EX models) or the 7-inch Display Audio touchscreen (standard on EX, EX-L, and Touring, and often includes the Navigation system).
I’ll break down the instructions for both systems. Don’t worry, neither process requires a trip to the dealership, just a few clicks or button presses.
Method 1: Setting the Clock on Non-Touchscreen Models (LX/Base EX)
If your CR-V is the LX trim, or an earlier EX model without the full touchscreen infotainment system, you’ll be using the knobs and buttons located below the smaller screen on your dashboard. This method involves a button labeled “MENU/CLOCK” and the “LIST PUSH SELECT” (LPS) knob, which is typically the larger, central knob.
This is the classic Honda method, and honestly, sometimes the physical buttons are just easier!
Step-by-Step for the Non-Touchscreen System
- Turn the Ignition ON: You need the car to be on or in accessory mode (where the lights and radio work) to access the settings. You don’t necessarily have to start the engine, but I usually find it easier to do so to avoid the car powering down halfway through.
- Access the Clock Menu: Locate the “MENU/CLOCK” button. Press and hold this button for a few seconds. You should see the screen change, and the clock display will usually start flashing or a menu with “Clock Adjustment” will appear.
- Select ‘Adjust Clock’: In most 2017 CR-V non-touchscreen models, pressing and holding the button brings up the options. Use the LPS knob (List Push Select) to navigate to the “Adjust Clock” option (if applicable) and push the knob in to select it.
- Set the Hour:
- Rotate the LPS knob to adjust the Hour.
- Once the hour is correct, push the LPS knob inward (like a button) to switch to the minute adjustment.
- Set the Minute:
- Rotate the LPS knob to adjust the Minutes.
- Confirm and Set:
- Push the LPS knob inward one last time. This should move the selection to a “Set” or “OK” option.
- Push the LPS knob inward again to finalize the new time. The clock will stop flashing and display the new time.
Method 2: Setting the Clock on Touchscreen Models (EX, EX-L, Touring)
For those of you with the 7-inch Display Audio touchscreen, the process is all digital, accessed through the on-screen menus. This applies to the majority of 2017 CR-Vs sold and is generally where the Daylight Saving Time confusion occurs.
A Crucial First Step for Touchscreens: Turn Off Automatic Time!
If your clock is consistently wrong, especially after a time change, it is almost certainly because the car is relying on its automatic time settings (often GPS-based). On models with Navigation (like the Touring trim), this system usually should work perfectly, but sometimes the connection or the local time zone offset gets wonky.
To manually set the time, you must disable the automatic setting first.
Step-by-Step for the Touchscreen System
- Put the Vehicle in Park (P): For safety reasons, the Honda infotainment system often restricts access to certain settings menus unless the vehicle is in Park.
- Go to the Home Screen: Press the “Home” button on the bezel next to the screen.
- Navigate to Settings:
- Select the “Settings” icon on the home screen. It usually looks like a gear.
- Find Clock Settings:
- Within the Settings menu, you’ll likely need to select “System,” then “Clock.” (The exact path can sometimes vary slightly, but look for “Clock” or “Date & Time” within the System or General Settings menus.)
- Disable Automatic Time:
- Look for an option like “Automatic Time,” “Auto Time Zone,” or “GPS Synchronization.”
- Tap this option to turn it “OFF.” This step is critical! If you don’t turn off the automatic setting, the car will just revert to the ‘wrong’ time after you set it.
- Access Adjustment Screen:
- Now, select “Clock Adjustment” or “Set Time.” You should see the time displayed with up (\triangle) and down (\nabla) arrows next to the hour and minute.
- Adjust the Time:
- Tap the up (\triangle) or down (\nabla) arrow next to the Hour until it is correct.
- Tap the up (\triangle) or down (\nabla) arrow next to the Minute until it is correct.
- Optional: This is also where you can change the format (12-hour vs. 24-hour clock).
- Finalize the Setting:
- Once the time is correct, select “OK” or “Save” on the screen.
You are all set! The new time will now be displayed on your infotainment screen and likely on the driver’s display as well.
Pro-Tips & Troubleshooting from Experience
Here are a few nuggets of wisdom I’ve picked up over the years that can help solve those final clock-setting mysteries:
- The Case of the Auto-Correction: If you have an EX-L or Touring with Navigation, your system is designed to get the time from the GPS satellites. If you find the manual setting keeps reverting to the wrong time, go back into the “Clock” settings and double-check your Time Zone setting. It might be set to the correct automatic time for the wrong time zone. Sometimes simply cycling the “Automatic Time Zone” from ON to OFF and back to ON again can force a refresh.
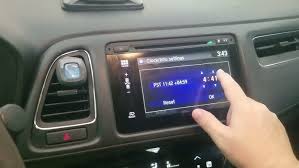
- The Quick Tap Shortcut (Touchscreen Only): On most 2017 CR-V touchscreen models, you can often tap the time displayed in the upper right corner of the screen (the “header area”). This acts as a shortcut that takes you directly to the Date & Time or Clock menu, saving you the steps of going through Home \rightarrow Settings.
- Daylight Saving Time (DST) Toggle: Look for a separate setting in the Clock menu labeled “Daylight Saving Time.” On some models, this is a separate switch. If it’s set incorrectly, your time will be off by one hour regardless of the other settings. Make sure it’s toggled to the correct position for your region.
- Need a Reset? If your screen seems frozen or non-responsive while trying to set the time, a quick trick is to reboot the infotainment system. On the 2017 CR-V, this is usually done by holding down the Audio Power/Volume Knob (the large knob) for about five to ten seconds until the system asks if you want to reboot. After the reboot, try setting the clock again.
Conclusion: Getting Back on Schedule
Setting the clock in your 2017 Honda CR-V is a task that should take less than two minutes once you know which system you have and where to look. Whether you’re a hands-on type who prefers the knobs of the LX or an admirer of the sleek touchscreen interface of the EX-L, the power to correct your time is now literally at your fingertips.
No more being that person who shows up an hour early (or late!) for an appointment because of a DST mishap! By following these clear, step-by-step instructions—and remembering to disable that sneaky automatic time setting on the touchscreen models—your CR-V will be displaying perfect time, keeping you on schedule for all your journeys ahead. Happy driving!