The act of resetting the oil life indicator in a Honda Pilot is a simple procedural task, but it is one that requires precision and, more importantly, a foundational understanding of the vehicle’s sophisticated maintenance system. The dashboard warning commonly referred to as the “honda pilot oil light” is typically a component of the Maintenance Minder (MM) system. This guide provides the expertise needed to execute the reset across all Pilot generations (2003–present) and clarifies the crucial maintenance requirements encoded within the display.
The Crucial Distinction: Oil Light vs. Maintenance Minder
Establishing the difference between a simple service reminder and a critical safety warning is the first step in responsible vehicle ownership.
The Myth of the “Oil Change Light”: Understanding the Honda Maintenance Minder System
The warning most drivers encounter is not a generic “oil light” but a calculated, intelligent service reminder called the Maintenance Minder (MM) system. Honda introduced this technology around 2006, transitioning away from fixed-mileage schedules to an adaptive system that offers a highly accurate estimation of oil lifespan.
The Maintenance Minder determines the proper timing for an oil change by factoring in real-world operational parameters, including engine temperature, engine load, total mileage driven, average vehicle speed, trip duration, and engine speed. This algorithmic approach allows the system to accurately predict oil degradation based on how the vehicle is actually used, which is significantly more reliable than the old static 3,000-mile guideline.
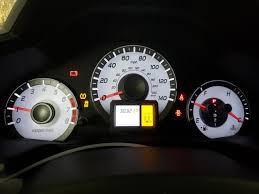
When service is due, the MM displays a percentage of remaining oil life (e.g., 50%) alongside a yellow or orange wrench icon on the dashboard. This icon may also be accompanied by specific alphanumeric service codes (A1, B2, etc.), detailing supplementary services required beyond a simple oil change.
Safety First: Recognizing the Red Oil Pressure Warning Symbol (Pull Over NOW)
It is absolutely critical to differentiate the yellow Maintenance Minder warning from the red “oil can” symbol. Confusing the two warnings could lead to immediate, catastrophic engine failure.
The yellow/orange wrench is a service scheduling reminder, indicating that an oil change is due soon. The car is safe to drive, allowing the owner time to plan maintenance, typically triggered when oil life hits 15%.
Conversely, the red “oil can” symbol indicates critically low oil pressure or an extremely low oil level. Low oil pressure means that the engine is not receiving the necessary lubrication; without oil, engine components begin grinding against each other, leading to extremely rapid and severe engine damage, essentially causing the engine to “self-destruct”.
Action Required: If the red oil pressure light illuminates, the driver must pull over immediately and safely shut the engine off. Continuing to drive is not an option. Once stopped, the owner should check the oil level and arrange for the vehicle to be towed to a qualified service center for inspection and repair.
Why the Reset is Mandatory
The Maintenance Minder system does not feature sensors that monitor the physical condition, quality, or level of the engine oil. It operates exclusively on an algorithm that counts down from 100%. Therefore, the system is “blind” to the actual service performed.
After an oil change is completed, the system must be manually reset. If the Maintenance Minder is not reset, it will continue calculating based on the oil life percentage prior to the service. This results in inaccurate future service reminders, potentially causing the owner to miss or delay the next crucial maintenance interval. Similarly, resetting the display without actually performing the required service will provide false timing for future maintenance events, compromising vehicle upkeep.
Decoding the Honda Maintenance Minder Codes
For a detailed understanding of the vehicle’s needs, owners must interpret the codes displayed alongside the oil life percentage. This information is key to ensuring comprehensive maintenance.
What the Oil Life Percentage Really Means
The percentage drop indicates the urgency of scheduling service:
- 15% Oil Life: Service is due soon. The yellow wrench tool icon appears. This is the ideal time to schedule or begin planning the oil change.
- 5% Oil Life: Service is due now. Vehicle maintenance should be performed as soon as possible.
- 0% Oil Life: Service is past due. The display will often show a mileage readout indicating how many miles overdue the service is. Service must be performed immediately to prevent harmful wear.
Understanding the Main Codes (A vs. B)
The Main Codes define the primary scope of the required maintenance:
- Code A: Requires replacing the Engine Oil only.
- Code B: Requires replacing the Engine Oil and Oil Filter, accompanied by a detailed inspection of select major components. These inspections typically include front and rear brakes, parking brake adjustment, the exhaust system, steering components, and suspension elements.
Understanding the Sub-Codes (1 through 7)
Sub-Codes indicate auxiliary maintenance required concurrently with the Main Code service:
- Code 1: Rotate Tires.
- Code 2: Replace the air cleaner element (engine air filter) and the dust and pollen filter (cabin filter), and inspect the drive belt.
- Code 3: Replace transmission fluid and transfer fluid (for All-Wheel Drive models).
- Code 4: Replace spark plugs and inspect valve clearance (a vital, major maintenance service).
- Code 5: Replace engine coolant.
- Code 7: Replace brake fluid.
While the system may display only Code A (oil change without filter), industry best practice dictates that for modern engines, the oil filter should always be replaced along with the oil, regardless of the code. This proactive approach ensures optimal filtration and engine cleanliness, moving the standard service closer to the specifications of the B code.
Step-by-Step Reset Procedures by Honda Pilot Generation
The procedure for how to reset the honda pilot oil light relies entirely on the vehicle’s model year, as the control interface—from simple dash knobs to integrated touchscreens—has evolved across generations.
Prerequisite: For nearly all models, ensure the engine is OFF, but the ignition is in the “Run” position (Position II), where all dashboard indicator lights are illuminated. For push-button start vehicles, press the ignition button twice without pressing the brake pedal.
1. Generation 1: The Classic Dash Knob Method (2003–2005)
These early models utilize a physical Select/Reset stem knob located directly on the instrument cluster.
- Turn the ignition switch to the OFF position.
- Locate the Select/Reset knob on the instrument panel.
- Press and hold this knob down.
- While continuously holding the knob, turn the ignition switch to the ON (II) position (do not start the engine).
- Continue holding the knob for approximately 10 seconds until the indicator resets, and the maintenance light is cleared.
2. Generation 2: The Two-Step Knob Reset (2006–2015)
The second generation introduced a two-step timing procedure for the reset, which is critical for successful completion. This method uses the Select/Reset knob, which may be on the dash or the steering wheel.
- Turn the ignition to the “Run” position (Position II, Engine OFF).
- Press the Select/Reset knob repeatedly until the “Engine Oil Life %” is displayed in the gauge cluster.
- Step 1 (Hold to Initiate): Press and hold the Select/Reset knob for at least 10 seconds. The oil life percentage and maintenance code(s) will begin to blink, indicating the system has entered reset mode. Release the knob.
- Step 2 (Hold to Execute): Within five seconds of releasing, press and hold the Select/Reset knob again for more than 5 seconds. The maintenance codes will disappear, and the oil life indicator percentage will successfully reset to 100%.
This two-step sequence is essential; skipping the second, shorter hold will only make the light blink, failing to complete the reset.
3. Generation 3, Phase 1: Steering Wheel & Dashboard MID (2016–2018 Models)
For these model years, the procedure shifts to the steering wheel controls, navigating the Multi-Information Display (MID) located within the instrument cluster.
- Turn the ignition to the “Run” position (Engine OFF).
- Use the steering wheel navigation buttons (Up/Down arrows) to cycle through the MID until the Oil Life percentage or the Maintenance screen is displayed.
- Press and hold the dedicated Reset or Enter button on the steering wheel controls for approximately 10 seconds.
- The display will change, presenting the options “Cancel” and “Reset.”
- Use the arrows to highlight Reset, and press the Enter/Reset button to confirm. The oil life will return to 100%.
4. Generation 3, Phase 2 & Early Gen 4: Infotainment Screen Reset (2019–2021)
Later third-generation models utilize the central touchscreen infotainment system for maintenance functions.
- Turn the ignition to the “Run” position (Engine OFF).
- Press the Home button on the infotainment panel to access the main menu.
- Navigate using the menus: Select Settings > Vehicle > Maintenance Information. (Some trims may use Home > Vehicle Settings > Maintenance Information ).
- Select the Oil Life option.
- Press and hold the Enter or Reset button (on the steering wheel or screen) for more than 10 seconds to prompt the reset mode.
- Select the maintenance item(s) to be reset (e.g., “Oil and Filter” or other specific sub-codes) and confirm the reset.
5. Generation 4: The Modern Touchscreen Approach (2022 and Newer)
Modern fourth-generation Pilots feature a simplified, highly graphical menu structure for maintenance resetting.
- The reset can typically be performed while the engine is running or in the ON (II) position.
- Access the main menu by pressing the Home button.
- Navigate to and select Maintenance.
- Choose Oil Life, then press and hold the Enter/Select button until the system enters the reset mode.
- The system will prompt for selection of the completed services. Owners can choose specific items (like “Oil and Filter”) or use the comprehensive “All Due Items” option to clear all outstanding reminders.
- Confirm the selection to complete the reset.
Expert Maintenance Practices and Technical Specifications
Resetting the oil life light is only valuable if the physical maintenance adheres to factory standards. Providing the correct technical specifications is crucial for maintaining vehicle integrity.
Before You Reset: Essential Oil Change Checklist
Before performing the reset procedure, a thorough check must confirm the maintenance was completed correctly. The professional sequence ensures all critical elements of the oil change are addressed:
- Oil Type and Viscosity: The Honda Pilot, particularly models since the introduction of the Maintenance Minder, requires premium-grade 0W-20 detergent oil. This oil must carry the API Certification Mark (“Starburst”) and meet API service SN or higher standards (such as SP).
- Oil Capacity: The typical capacity for the Honda Pilot 3.5L V6 engine (J35Y series) is 5.8 quarts when the filter is replaced. The level must be confirmed using the dipstick after a brief running period.
- The Crush Washer: This is a vital but often overlooked detail. The 14mm aluminum crush washer (gasket) on the oil drain plug must be replaced during every oil change. Reusing a compressed washer is the primary cause of slow oil pan leaks. The new washer should be torqued to 30 foot-pounds.
- Oil Filter: Always install a new, quality oil filter. Honda OEM filters (e.g., Part No. 15400-PLM-A02) are recommended, as they guarantee optimal flow and fit, although high-quality aftermarket filters meeting OE specifications are acceptable.
Troubleshooting the Reset
When the light refuses to reset, the problem usually relates to timing or menu navigation.
- Gen 2 Timing Errors: If the 2006–2015 Pilot only blinks but doesn’t reset, the user missed the crucial second, 5-second hold required to execute the command after releasing the initial 10-second hold.
- Persistent Codes: If the oil life shows 100% but secondary codes (like B1 or 2) remain, the owner must re-enter the maintenance menu (for digital models) and manually reset the specific sub-codes associated with services like tire rotation or filter replacement. If only the oil life parameter is reset, the reminders for other overdue services will persist.
Conclusion
Mastering how to reset the honda pilot oil light is a straightforward process once the specific procedure for the vehicle’s model year is identified and followed precisely. The necessity of this manual reset underscores the system’s function: it is a calculation tool that requires human input to confirm completed service.
For optimal vehicle longevity, it is essential that owners prioritize safety by recognizing the critical difference between the yellow Maintenance Minder reminder and the red oil pressure safety light. Furthermore, any reset procedure must be preceded by a complete and technically correct oil change, including the use of 0W-20 oil, replacement of the oil filter, and installation of a new crush washer to prevent leaks and ensure the engine receives the necessary protection for the next service interval.