You catch it in a parking lot window or notice it when a driver behind you flashes their lights. One of your CR-V’s tail lights is out. It’s a small problem on the surface, but it’s a real safety risk — and depending on where you live, it can mean a traffic stop.
Here’s the good news: changing a Honda CR-V tail light is one of the more approachable DIY repairs you can make. In most cases, all you need are basic hand tools and 15 to 30 minutes. This guide covers every generation of the CR-V — from the 1997 original all the way through the current sixth-generation model — with step-by-step instructions, correct bulb numbers, cost comparisons, and troubleshooting for when the fix isn’t as simple as swapping a bulb.
Let’s start with the question most people skip: what’s actually causing the problem?
Step One: Diagnose Before You Buy Anything
Rushing out to buy a bulb before knowing what’s wrong is how people make two trips to the auto parts store. A few minutes of diagnosis now saves that frustration.
What Your Symptom Is Telling You
One specific light is out (brake doesn’t work, but running light does): This almost always means a burnt-out bulb. Many CR-V models use dual-filament bulbs that handle two functions — brake and tail light — in one unit. When one filament fails, the other keeps working. The fix is a simple bulb swap.
All tail lights went out at once: Multiple lights failing simultaneously usually means a blown fuse, not a dead bulb. Don’t buy parts yet — check the fuse box first.
Brake lights are stuck on, even with the car off: This is a well-known Honda quirk, and it’s not a wiring problem. A small plastic stopper on the brake pedal arm has likely crumbled. Without it, the brake light switch stays engaged permanently. The fix costs about $5. More on this in the troubleshooting section.
You replaced the bulb, and it still doesn’t work: The problem is now upstream — a corroded socket, a loose wire, or a blown fuse that was missed. Check those before replacing anything else.
What You’ll Need
For most generations, a basic tool kit is all it takes:
- Safety glasses and nitrile gloves
- Phillips head screwdriver
- 8mm socket with ratchet and short extension
- Flat blade screwdriver or plastic trim removal tool (prevents scratching)
For fifth and sixth-gen CR-Vs with LED assemblies, add a dedicated plastic trim tool kit. Modern assemblies rely more heavily on plastic clips, and metal prying tools will crack them.
One extra tip worth passing along: keep a small telescopic magnet nearby. Dropping a bolt into the body panel cavity during this job is easy, and fishing it out is not.
Bulb or Full Assembly? The Key Generational Difference
This is the most important thing to understand before you start shopping for parts.
Generations 1 through 4 (1997–2016) use standard incandescent bulbs. The tail light housing is a lens-and-reflector unit designed to be opened, and individual bulbs are cheap and easy to find.
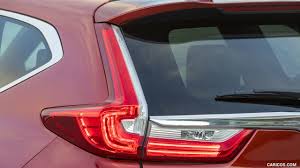
Generations 5 and 6 (2017–present) use integrated LED units. The LEDs are sealed into the housing on a circuit board. If an LED section fails, the entire assembly needs to be replaced — you can’t swap just the bulb. This changes both the procedure and the cost significantly.
The one important exception: even on newer models, Honda typically uses a standard replaceable incandescent bulb for the rear turn signal and sometimes the reverse light. This can save you from buying an entire assembly when only a small bulb has failed.
Honda CR-V Tail Light Bulb Reference Chart (1997–2024)
For owners of first through fourth-gen CR-Vs, getting the right bulb number matters. Using the wrong type means it won’t fit, won’t work, or can damage the housing.
| Generation | Brake / Tail | Turn Signal | Reverse | Marker |
|---|---|---|---|---|
| 1st Gen (1997–2001) | 7443 | 7443 | T15 / 921 | T10 / 168 |
| 2nd Gen (2002–2006) | 7443 or 1157* | 7443 or 1156* | 7443 | T10 / 168 |
| 3rd Gen (2007–2011) | 7443 | 7440 Amber | 7440 | T10 / 168 |
| 4th Gen (2012–2016) | 7443 | 7443 or 1157** | 7443 | T10 / 168 |
| 5th Gen (2017–2022) | LED Assembly | LED Assy or 7440*** | LED Assy or 921*** | LED Assembly |
| 6th Gen (2023–present) | LED Assembly | 7440 Amber | LED Assembly | LED Assembly |
Notes:
- *Second-gen variation: check your VIN’s first character. “J” means Japan-built (7443/7440 style); “S” means UK-built (1157/1156 style).
- **Fourth gen (2012–2014): some vehicles use 1157 for turn signals. Confirm by pulling the existing bulb before buying.
- ***Fifth and sixth gen: the main brake/tail lights are sealed LED, but turn signals and reverse lights are often standard replaceable bulbs — check before assuming you need a full assembly.
Step-by-Step Replacement by Generation
First Generation (1997–2001)
Tools needed: Phillips screwdriver
- With the rear hatch closed, locate the three Phillips screws on the colored side of the tail light assembly.
- Remove the screws and set them aside safely.
- Grip the assembly and swing it outward — it pivots away from the body.
- Twist the relevant bulb socket about a quarter-turn counter-clockwise and pull it straight out.
- Pull the old bulb out of the socket. Wearing gloves, press the new bulb in until it clicks.
- Reinsert the socket, twist clockwise to lock, pivot the assembly back, and reinstall the screws.
Pro tip: Plastic lenses on 20-plus-year-old CR-Vs are brittle from UV exposure. When reinstalling the screws, stop when they’re snug. Overtightening is the most common cause of cracked housings on these older cars.
Second Generation (2002–2006)
Tools needed: 8mm socket and ratchet, flat blade or trim tool
- Open the rear tailgate fully.
- Locate the two small circular plastic caps on the black interior trim of the assembly.
- Pry the caps off gently with a flat blade or trim tool.
- Remove the two 8mm bolts underneath.
- Pull the assembly straight back — away from the car — to release the clips on the outer edge.
- Twist the sockets out, replace the bulbs, and reinstall in reverse order.
Pro tip: Those clips can be stiff if the light has never been removed. Pull firmly and directly straight back. Rocking the assembly side-to-side can snap the alignment pins on the back of the housing, which makes reinstallation difficult.
Third Generation (2007–2011)
Tools needed: 8mm socket and ratchet, screwdriver
The third gen is very similar to the second. If you’ve done one, you already know the process.
- Open the rear hatch.
- Pop off the two circular plastic caps inside the assembly to reveal the 8mm bolts.
- Remove both bolts. Use the socket rather than a screwdriver — better grip, less chance of stripping.
- Pull the housing straight rearward to release the three clips along the outer side.
- Twist the sockets out and replace the relevant bulbs. Brake light: 7443. Turn signal: 7440 amber. Reverse: 7440 clear. Marker: 194.
- Reinstall the sockets, press the assembly back, and replace the bolts.
Pro tip: Before pushing the assembly back in, look at the plastic pins on the back of the housing and align them with their corresponding holes in the body. A correct alignment produces a clean “click” when the clips engage.
Fourth Generation (2012–2016)
Tools needed: Socket set, Phillips screwdriver
The fourth gen splits the tail light into two sections: a main lower assembly on the body and a smaller upper section on the tailgate.
- Open the tailgate. The main lower assembly is held by two bolts accessible from inside the door jamb.
- Remove both bolts and pull the assembly straight rearward to release the clips.
- Brake, turn signal, and reverse bulbs are all in the lower section. Twist sockets out and replace as needed.
- The upper tailgate section houses a small T10/168 marker bulb, typically behind a small interior trim panel that pries off.
Pro tip: The high-mount third brake light at the top of the rear window on these models is often a sealed LED. If that specific light fails, it cannot be re-lamped — the entire unit needs replacement.
Fifth Generation (2017–2022)
Tools needed: Ratchet and socket set, trim removal kit
This generation primarily requires a full assembly swap for the main brake and tail lights.
- Open the liftgate and remove any plastic trim panel covering the mounting hardware.
- Remove the mounting bolts — typically two or three 8mm bolts.
- Disconnect the main electrical harness connector by pressing the release tab and pulling it free.
- Use a plastic trim tool to gently work around the seam between the light and the body. Pull the assembly straight back with steady pressure.
- Before installing the new assembly, connect the harness and test the lights. Confirm it’s working before you lock it in.
- Align the pins with the body holes, push the assembly firmly into place until the clips engage, then reinstall the bolts.
Pro tip: A common mistake is pushing the assembly straight in without also pressing it inward toward the vehicle centerline. The housing needs to slide onto mounting tabs. Push both inward and forward to get a flush, factory fit with no visible gap.
Sixth Generation (2023–Present)
Tools needed: Screwdriver, socket set
The latest CR-V continues using sealed LED for main functions, but the rear turn signal bulb is replaceable — a welcome change for DIYers.
- Open the liftgate and locate the two mounting screws (one top, one bottom) on the outer assembly.
- Remove both screws.
- Pull the assembly straight back with firm, even pressure to release the clips.
- Disconnect the electrical harnesses by pressing each release tab.
- To replace the turn signal bulb only: find the removable socket (it’s clearly distinguishable from the sealed sections), twist it counter-clockwise, and replace the 7440A amber bulb.
- To swap the full assembly: connect the harness to the new unit, align the clips, press it firmly into place, and reinstall the two screws.
Pro tip: If you notice moisture or condensation inside the lens on a newer CR-V, don’t try to fix it yourself. This is a factory defect and a warranty issue. Take it to the dealership for a free replacement.
What It Actually Costs: DIY vs. Dealer
| Generation | Repair Type | DIY Cost | Dealer/Shop Estimate |
|---|---|---|---|
| Gen 1–4 (1997–2016) | Bulb replacement | $10–$25 per pair | $115–$190 |
| Gen 5–6 (2017–present) | Assembly replacement | $80–$250 (aftermarket) / $250–$450+ (OEM) | $400–$600+ |
For older CR-Vs, the savings are obvious. You’re paying a shop almost entirely for labor on a part that costs less than $20.
For newer models, the savings are larger in absolute terms. Dealerships and body shops regularly quote $500 or more for a tail light assembly replacement. Sourcing your own part and installing it with two bolts and a trim tool can save you $300 or more on a job that takes 30 minutes.
Advanced Troubleshooting
Brake Lights Won’t Turn Off
This is one of the most common complaints on Honda forums, and it almost always has one cause: a disintegrated brake pedal stopper.
Under the dashboard, where the brake pedal arm pivots, sits a small plastic or rubber stopper. It contacts the brake light switch and keeps it from staying on when the pedal is released. After years of heat cycles, this piece becomes brittle, breaks apart, and falls onto your driver’s side floor mat.
To confirm: look at your floor mat for small colorful plastic fragments. Then reach under the dash and feel the pedal arm — you’ll find a small hole where the stopper used to be, with the switch plunger passing straight through it.
The fix: a $5 “Brake Pedal Stopper Pad” from any Honda dealer or auto parts store. You press the new one into the hole on the arm. Awkward position, simple repair.
If you need to protect the battery until you get the part: a wad of tape or a small bolt and nut through the hole will create enough contact to press the switch and turn the lights off temporarily.
Still No Power After a New Bulb
Check the fuses first. A moisture-damaged lens or an electrical surge can blow the fuse protecting the tail light circuit. Your CR-V has fuse boxes in both the engine bay and under the driver’s dash. Look for a fuse labeled STOP or TAIL in the diagram inside the fuse box cover. Pull it out and hold it to the light — a broken wire inside means it needs to be replaced with one of the exact same amperage rating.
Inspect the socket. Pull the bulb socket out and look at the metal contacts. Green or white buildup is corrosion and it blocks the connection. Clean it with a small wire brush or electrical contact cleaner, then test again.
Use a multimeter if needed. Set it to DC volts, touch the red probe to a socket contact and the black probe to any bare metal ground on the chassis. With the lights on, you should read around 12 volts. No reading means the problem is somewhere in the wiring between the fuse box and the tail light — at that point, it may be worth calling in a professional.
OEM vs. Aftermarket Assemblies
For owners replacing a full LED assembly, the parts decision matters.
OEM parts guarantee a perfect fit, color match, and weather seal. The downside is price — dealership OEM pricing is often two to three times the cost of equivalent aftermarket parts.
Aftermarket parts are substantially cheaper and offer style options like smoked or clear lenses. Quality varies, though. Budget no-name units are a gamble — thin plastic, poor seals, and fitment issues are common complaints.
A middle-ground approach: stick with brands like DEPO, TYC, or Eagle Eyes. These meet DOT standards and offer near-OEM fit and finish at a fraction of the dealership price. If your car is still under warranty, or if appearance matching is critical, OEM is the safer call.
Upgrading Older CR-Vs to LED Bulbs
Owners of Gen 1–4 CR-Vs can replace their incandescent bulbs with aftermarket LED equivalents. LEDs are brighter, react faster (which gives following drivers a bit more stopping distance), use less power, and last much longer.
The one issue to know about: hyper-flashing on turn signals. Because LEDs draw less current, your car’s flasher relay detects what looks like a burnt-out bulb and makes the turn signal blink rapidly. The fix is an in-line resistor wired in parallel with each LED turn signal bulb. This adds artificial electrical load and brings the flash rate back to normal. Many LED turn signal kits come with resistors included — check before you buy.
Final Thoughts
Changing a Honda CR-V tail light is the kind of repair that pays dividends beyond the money saved. You understand your vehicle a little better, you know the fix came from your own hands, and you’re not left wondering if the shop added unnecessary work to the bill.
For most CR-V owners, this is a 15-to-30-minute job. The diagnostic section at the top makes sure you’re replacing the right thing. The generation-specific steps make sure you’re doing it the right way. And the troubleshooting section handles the cases where the obvious fix doesn’t immediately work.
If you hit a specific snag with your model year or ran into something this guide didn’t cover, drop your question in the comments. These repairs are almost always solvable — and usually simpler than they first appear.
FAQ
Can I change a Honda CR-V tail light myself without mechanical experience? Yes. For generations 1 through 4, it requires only a basic screwdriver and socket set. For fifth and sixth-gen models replacing a full assembly, a plastic trim tool is helpful but the job is still straightforward.
Why won’t my CR-V brake lights turn off? The most likely cause is a failed brake pedal stopper — a small plastic piece that deteriorates over time. Check your floor mat for small plastic fragments and look for a hole in the brake pedal arm under the dash. The replacement part costs about $5.
Do I need to replace both tail lights at once? It’s strongly recommended. Both lights have experienced the same operating hours and conditions. If one has failed, the other is often close behind. Replacing in pairs also ensures even light output.
My CR-V is a 2018 and only the turn signal is out — do I need a full assembly? Not necessarily. Fifth-gen CR-Vs often use a standard replaceable bulb for the rear turn signal, even though the main brake and tail lights are sealed LEDs. Check the socket — it should be removable with a counter-clockwise twist.
What’s the difference between a 7443 and a 7440 bulb? Both are wedge-base bulbs, but the 7443 has two filaments (used for brake and tail light functions) while the 7440 has a single filament. Using the wrong one in a dual-function socket will result in only one function working.
Is aftermarket or OEM better for a replacement tail light assembly? For most drivers, a reputable aftermarket brand like DEPO or TYC offers the best value — solid fit, DOT compliance, and significant cost savings over OEM. If your vehicle is still under warranty or appearance matching is essential, OEM is the safer choice.